When I first started learning about photography, I wanted to understand the fastest, easiest way to improve my pictures. I got a book (as recommended by the amazing Erika McCauley), and started reading. The problem... I still didn't understand most of the language, and reading is time consuming. I wanted instant gratification! In the end... I needed practice and patience. But... knowing what I know now. I have a suggestion for YOU. Your quick answer is aperture. I know, not a word that sounds very fun, but I promise, it will become one of your best friends. Now, please understand, there are a million things that go into creating that beautiful image. But, in my brief experience, I've found that focusing on too many of those things confuses me and eventually bogs me down. So, for now, let's focus on aperture.
Aperture: aperture is the unit of measurement that defines the size of the opening in the lens that can be adjusted to control the amount of light reaching the film or digital sensor. The size of the aperture is measured in F-stop.
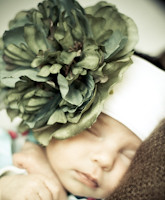
What the!?! Ok, take a deep breath. Step away from the mouse you were about to throw at your computer screen, and walk with me. ;) What you need to know is this - aperture gives you that beautiful blurry, buttery background you love. Look at the picture below:
Ahh... do you feel better?

Do you love that amazing blurry background? Then you will love learning about aperture! The second thing you need to know - aperture is talked about in terms of f-stops. I won't bore you with why they're called f-stops (and to be honest, you don't need to know... it's sort of like Algebra... don't ask why you need to know it, just know you need to know!). Low f-stops mean blurry background, high f-stops mean less/no blur. Now... there is this really exciting description of how those f-stops relate to the amount of light that reaches the image sensor... oh crap, I've already lost you again. Sorry. Don't worry, not going to bore you with image sensors and light openings. Back to what you need to know - low f-stop = blur, high f-stop = crisp. Again... low f-stop = blurry background, high f-stop = crisp background.
Now let's put this to practice:
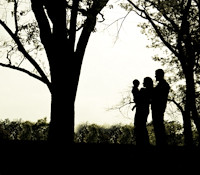
Here is an example of a low f-stop: f 1.4
See how nice and crisp her face is, but how blurry her shoulders are?

You can barely make out specifics in the background on this one - nice and blurry. F-1.4


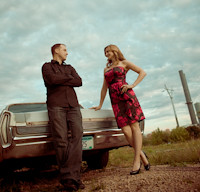
Now here's an example of a high f-stop: F-5.6. Do you see how crisp EVERYTHING in the photo is? Now picture it if I had used a low f-stop. The background would be blurry... not nearly as impactful, right? (Yes... I crossed that scary bridge - TWICE!)


One last example of a high f-stop. F-5.6. Imagine this with a low f-stop. It would totally take away the power of the image. We are on top of a 14,000 ft mountain that we just climbed. The view was spectacular. When we took this photo, the view was the story we wanted to tell - if we had lowered the f-stop, what would the story be? 4 people dressed for cold weather in June... not nearly as exciting. ;)

F Gone Wrong:
What were we thinking?!? This is obviously in a very early stage of learning about photography! Love the blurry background and the way the light behind me sort of fades the landscape. Neat, EXCEPT, I was looking at the most amazing view of the sea from our Bed and Breakfast window on the Northern coast of IRELAND! No way you could tell that from this photo! We should've stopped and made the f-stop much higher so we could crisply see the rooftops out the window and the beautiful sea in the background!

Here's another mis-hap, although a little less obvious. Behind me is the most amazing castle, again on the ocean in Ireland. You can make out the castle, but there aren't any details. This photo would have been much more impactful had we set the f-stop at a 4.5+ and we could appreciate the beauty of the ancient structure!

F-Misses:
When I look at photos I've taken, I sometimes see opportunities I've missed. Here's an example of a great family photo from a recent session. This is an f-stop in the 3 range. There is an ever so slight blur on the last little girl's face, and the first little girl is crisp. Here's what I could've done:
Option 1: Bump up the f-stop so that everyone is crisp. Great family photo!
Option 2: Lower the f-stop to a 1.4 or lower and really focus on the first girl. In the background you would see really blurry images of the other two and their smiles. This option would elicit so much more emotion than the first option.
Which would you choose?
 Another option for this photo would've been to really lower the f-stop and give it the same feel as the fence photo above. Focus in on the first portion of the path and let everything else melt away.
What would you have done?

I know this is a lot... read this post a couple times, and then practice! Even if you just have a point-and-click - see if there is an Aperture Priority mode ("A" or "AV"). Put your camera on that mode and try to play with the f-stops. What sort of photos do you like to take? Crisp landscapes or blurry portraits?

0 comments:
Post a Comment